Thursday, August 20, 2020

COLOR 106 - DYES SIMPLIFIED

[Originally published August 2019] 

 I do recommend Al Stohlman's book, Coloring Leather, (not How to Color Leather).  It is still a very relevant book. 


There are a few changes happening in the world of dyes - solvent (spirit based / alcohol based) dyes are being upstaged by the water based dyes.  Some states have stopped the sale of solvent (alcohol) based dyes. 

 Fiebings Pro-dye is a higher quality version of alcohol / spirit based dye - it is simply alcohol based dye (no oil) with a bit of an improved recipe and a superior oil-based pigment -  it gives better penetration into the leather and takes a bit longer to dry.  The coverage is a bit more even.  First choice if you can get it.

 Eco-Flow water based dye - the new generation dyes - so far looks to be an equally good choice, mainly because they are  proving to be a lot more color fast than the old regular spirit based dyes. 

 I know your leather craft store is stocked with hundreds of little bottles, so I will expand on this theme as much as I can, but here is the short version:

  1. The first liquid to hit your leather, is water if you want to tool and/or shape your leather ("casing").
  2. The next liquid to touch your leather, is dye, if you want to change the color of the leather or parts of the leather.
  3. The third possible liquid you use, is a resist (in order of preference: Neatlac / Eco-Flo Top Coat / SuperSheen), if you want to shield some parts of the leather by being colored by the next liquid.  There is another article on this blog about resisting. 
    Fiebings Pro Resist only works with Fiebings Antique Paste.
  4. Now you can consider using an antique finish/stain on the leather, if you wish to have an antiquing effect, mostly on tooled leather (it leaves a dark residue  in the tool impressions and makes them more pronounced).
  5. Lastly you add a finish / dressing / conditioner:  for working leather I prefer Dubbin, Dr Jackson's, Neatlac or Aussie; for leather that was painted with acrylic paints, I prefer and acrylic finish like Supersheen or Satinsheen.

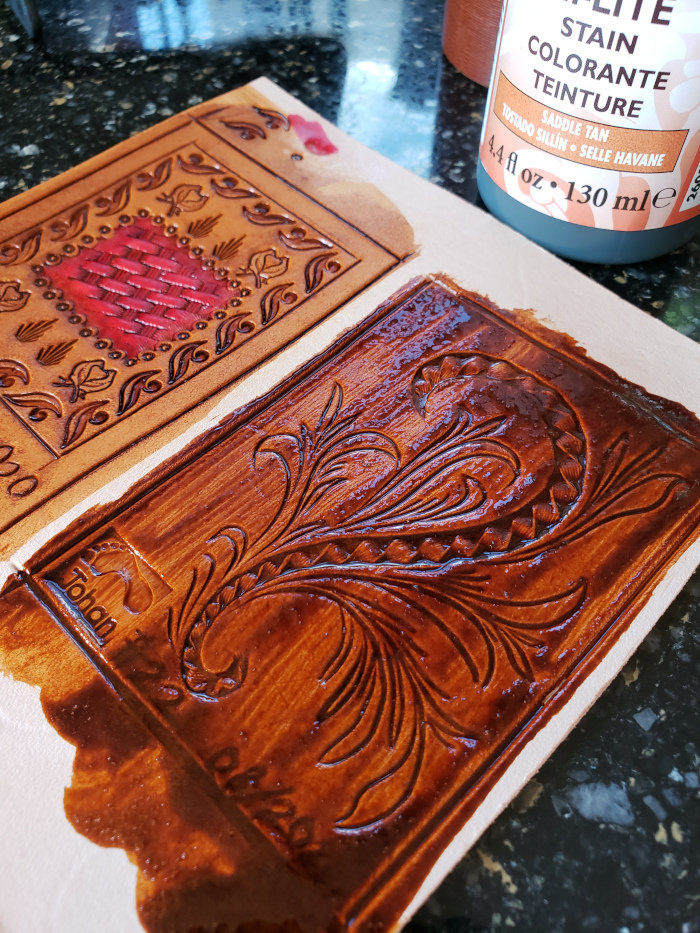
If you want a light stain and thereby enhance the tooling on the leather, one way you can try is to dye your project with a much diluted (with water) Eco-Flo dye, or spirit based dye diluted with rubbing alcohol. To further emphasize the tooling, you can use an antique finish/stain over the dye - the antique stain will add its own color to the project, unless you have the project fully or partially resisted. For a more subtle effect, the Eco-Flow Hi-lite Stain dilutes very successfully! 

 I hope this sheds some light!  (... and color....) 

 (Updated 21 October 2019)

Wednesday, August 19, 2020

COLOR 105 USING A BRUSH

[Originally published August 2006] 

Oil based dye with a brush

For this mini tutorial, Fiebings Pro Dye is being applied with a brush.    
(In 2006 it was still labeled as Oil Dye, but that really only referred to the fact that they used an oil pigment in the dye - it is still just an alcohol based dye.)

 The same technique would be used with water based dyes - water based dye tends to flow a fraction further than alcohol based dyes, so test it first. 
 The background of an inverted carving is being dyed - the design is left natural. Take note how the fully loaded brush is never set down right next to the edge of the area to be dyed - this is to prevent the dye from bleeding into the area that has to remain dye free. 
 Because the black dye in this case is quite forgiving, mere application of the dye will ensure even coverage. So as the dye in the brush is used up, the brush is brought closer and closer to the edge of the design. [No sound on the following video]


(Updated 26 October 2019)

Tuesday, August 18, 2020

COLOR 104 ALL-IN-ONE

[Originally published August 2006] 
  
Use of All-in-One


All-in-One is a product sold by Tandy Leather. It is both a dye and a finish all in one! 
It works very well in situations where you want to dye a complete piece of leather. It also has a darkening effect in tool impressions. The finish is much like Super Sheen, a water based acrylic finish. There is therefore no fumes to sniff or worry about. 

 In this little video, you will see how this product is applied and how the excess is wiped off. Take care to wipe off lightly enough so that the All-in-One is left in the tool impressions, and do not get wiped out of those depressions - you want it to dry there to have the eventual darker effect.


 The photo below show the finished piece of leather incorporated into a card holder. 
 (The back part of the card holder was done in the frog skin pattern shown else where in this blog and then it was colored with acrylic paint.) 

Finished Card Holder

(Updated 22 October 2019)

Monday, August 17, 2020

COLOR 103 ANTIQUEING

[Originally published August 2006] 


Applying Antique Finishes

  • This step can be left out so that your dye job remains clean and fresh looking.
  • Antique Finish/Stain, like Eco-Flo Hi-Lite stain and Antique Gel, can be used after you have optionally dyed leather.
  • Although antique finish is water based, it is not an acrylic, so it is not very permanent and will wear and wash off. It has to be sealed with a finish / sealer.  For this I like Fiebings Leather Sheen in a spraycan.

The intended use of antique finish is as follows:

  1. Let your project dry completely after applying water-based, alcohol/spirit-based dye.
  2. Optionally cover the project with a resist, which can be any of the following : Eco-Flo Top Coat, Neatlac, Supersheen, or RTC.
  3. Let the resist dry, as in overnight.
  4. Now apply the antique paste or liquid with a damp sponge very liberally, so that it gets into all your tooling impressions and cracks.
  5. Have a clean damp sponge or dry paper towel handy and start wiping off the excess finish from the non-tooled areas. You do not want the antiquing to dry and cause streaking on the leather where there is no tooling. Gradually work towards the tooled areas and wipe the excess finish off there as well, leaving only the accentuated tooled areas with finish in.
  6. Let the antiquing dry overnight again and then apply the finish of your choice to seal the antique.

This video shows how Hi-Lite Stain is applied - the technique is exactly the same for Antique Gel (also by Eco-Flo).   You will also see a resist and dye being used first and then how that pans out when you do the antiquing over it.

Here is a long winded "Live" video that shows Hi-Lite stain even used over vinagroon:


 (Updated 23 August 2020)

Sunday, August 16, 2020

COLOR 102 DYE BASICS

[Originally published August 2006]

Leather can be left natural and not dyed - in time it will turn a beautiful honey color. 
This natural darkening of vegtan leather, will be accelerated if some oil is put on the leather as a dressing (oxidation - has nothing to do with light!). (See the posting about dressings and finishes.) 

The oil and spirit (alcohol) based dyes sold by Tandy and Fiebings are meant for dyeing veg-tan leather only. 
Although it might look successful on any other leather, it will most likely bleed off or rub off on clothing. In other words, it is not meant for leather fibers that has some sort of finish on already. 

Clean Leather 

In order for the dye to take evenly on the leather, the surface of the leather has to be clean and free of oily marks
I prefer to keep the leather surface clean from the start of the project. If I have to lean on the leather or rest my hand on the leather, I rest it on a piece of off-cut leather to reduce the possibility of natural oil from my hand or arm to cause marks on the leather. 
If you have to, you can clean the leather with a damp sponge or rag with some diluted saddle soap on. Then rinse it and let it dry.
Or you can use deglazer to clean the surface.

Dye Even 

Give this a thought: Perfectly evenly dyed leather will look like factory produced leather or vinyl. Leather is a natural product and uneven in nature. 

Getting an acceptable even dye job pivots around one key factor: the surface of the leather has to be saturated with the dye. 

Using the dye out of the bottle full strength might end in a too dark effect, especially if you put so much dye on as to get an evenly saturated surface. 
You can dilute the spirit based dyes with the solvents sold for the purpose, or with rubbing alcohol
 You can always dye in two or more "layers" to get the color darker, but by working with diluted dyes, you can saturate the leather and not get it so very dark. 

 There are experienced leathercrafters that believe in lightly oiling the leather and letting it stand a day or two and then applying the dye. The oil is supposed to resist the dye so that it spreads around a bit more before it actually gets to the fibers to color them. (This has historical roots, so remember:   In the old days the leather was different, the liquids had different recipes, the methods of the old timers is not always well explained, etc..)

My opinion is that you then place a barrier around the fibers and some of the dye pigments will not penetrate the fibers, but sit on top of the fibers and later rub off on your clothes. Especially when now working with water-based liquids.

 So for alcohol-based dyes, you might rather try the following to get the color even: 
First saturate the leather just with clean rubbing alcohol or solvent and while it is still good and wet, apply the dye - this will allow the dye to bleed and spread more evenly on the leather. 

Deliberately Uneven 

Some of the best leatherwork I have seen, have been where the dye was applied uneven on purpose - like darker around the edge. 
Whether you are trying to color evenly or not, I have found that long lengthwise strokes with the applicator is more successful and gives a more natural effect than working in small little circles. [I hope Al Stohlman does not turn over in his grave....]


"Saturate the leather with the dye......"  

 Here is the two pieces of leather I dyed in the video - they do not have any conditioner or finish on in this photo:


In General
  • You can dye on damp leather - only use stain on dry leather.
  • When you apply dye to leather, the leather thinks it is wet, and it will show darker - as the solvent in the dye evaporates, the color will lighten considerably.
    It is a good idea to let the project sit for a while to dry before you judge whether you dyed dark enough or not.
  • Bright colors like turquoises will loose their brilliance as the leather turns naturally darker with exposure to oxygen (oxidation).
  • White is not a leather color. White can only successfully achieved on leather if it is applied as part of the tanning process. Basically you can dye leather darker, but never lighter.  The one exception is diluted white acrylic paint.
  • To dye veg tan leather black, you might consider first dyeing it in a dark shade of brown or navy blue or even purple. If the dye then fades a bit, it will not show the natural light brown underneath. However, nowadays the new black dyes come so strongly pigmented that two coats or a dark undercoat are hardly necessary.
  • Make yourself a base of sponge, or layered leather or wood to set the dye bottle in to make sure it does not tip over while you are working - the spirit based dye is evil and WILL climb out of the bottle at every opportunity!
  • For the same reason, always close the lid of the bottle when you are taking a breather - an unattended open dye bottle WILL fall over and spoil your project, the tablecloth, the chair upholstery, your pants and the cat and the carpet...!  Or all of them!

Hope This Helps! 

[Updated Aug 23rd, 2020]

Saturday, August 1, 2020

Vinagroon

.... or a cheap effective way to turn leather black, without fighting with dyes and without fear of it bleeding off on clothing.

I have also compared very old and new vinagroon - grey vs black!
Here is the
LINK

This is a very old method.  In its simplest form:  you let vinegar chew on some iron/steel for a few days and use it to chemically change the leather color to black.

The photo below shows what I am experimenting with.  I took five of those nails, covered them with 1/4 cup of white vinegar and 18 hours later dipped the piece of leather in the solution.

I have added a pint of vinegar and twenty more nails and now I will let that stand for a few days and play again.

UPDATE:  So it stood for a week and then I took the first part of this video showing the filtering of the vinagroon.

The second part of the video, where I am using it, was taken a week after the filtering process.

I like simplicity, but for the sake of giving you a complete picture, I will quote from the interwebs here:

From the forum of the America Leather Chemists Association:

The black color is the reaction of Ferric salts or oxide with tannins, nice formula for leather crafts, but it is a pain in the neck in vegetable tannery.

About "neutralizing" the vinegar's acid:  The leather may be damaged by the excess of acid: white vinegar is acetic acid and if applied in excess can give some problem according to what was stated in the post. Iron react with vegetable tannins giving a product that is black.

 Neutralizing the leather is not wrong. In the industrial process this is also being used even though the term is confusing because it does not mean to take the leather up to the neutral pH condition or the 7.0 value. It means to neutralize some of the acid inside the leather to avoid acid damage. The final pH for vegetable leather can be around 4.0 and this is far from neutral.

I recently had a question (on one of my videos on YouTube) about the danger of vinagroon attacking the metal of guns or knives if you use it to stain leather black.
Here is my answer:
The vinagroon does not significantly change the pH of the leather. So this method does not change the safety aspect at all.
BUT, leather, with its inherent acidity, will damage metal such as knife blades or guns in the long term. I have asked the Leather Chemists of America about this and the answer is quite simple. The danger to the metal happens when you bring together three elements: water, metal and the acidic leather. So you want to prevent this trio getting together.
The simplest is to use an oily/waxy finish on the leather often, thereby preventing water to get into the mix, and now the acidity of the leather cannot attack the metal.

Chuck Burrows posted this in 2010:

VINEGAR BLACK 
For giving color to the grain of leather there is no blacking that will at all compare with the well known vinegar black. This may be made in various ways. The simplest, and, without doubt, the best, is to procure shavings from an iron turner (note: some folks get the turnings from brake drums) and cover them with pure cider vinegar; heat up and set aside for a week or two, then heat again and set in a cool place for two weeks; pour off the vinegar, allow it to stand for a few days, and draw off and cork up in bottles. This will keep for a long time, and, while producing a deep black on leather, will not stain the hands. 

How I do it most times:
I use de-oiled 4/0 steel wool: dip in acetone, squeeze out the extra and hang to dry - then tear or cut into small pieces. Add one pads worth of the de-oiled steel wool to one quart of white or cider vinegar - I use those plastic coffee "cans" and punch a single small hole in the lid to let of any gas buildup. Let it set in the hot sun which will speed the reaction. I let it set for about two weeks until there is only a light vinegar odor left and/or the bulk of the steel wool has been dissolved. I also keep a new batch "cooking" all the time so I have a constant supply.
For the deepest black, apply a bath of strong black tea first (this increase the tannins) and let it soak in good, then apply a generous amount of the vinegar black. Let set for about a half hour and then rinse with a mix of baking soda and warm water, about a 1/8 cup soda to a half gallon of water, apply let set for a few minutes and then rinse off. While still damp apply a light coat or two of your favorite saddle oil. Once dry top coat as normal
Experiment - I test a piece of each new side without oiling to see how well it takes the blacking, if need be I'll do a second black tea mix to darken, then apply the oil which also helps darken.

Instead of steel wool you can use chopped up bailing or fence wire - the smaller the better since it will dissolve in the vinegar bath faster.

1) Does the 'rooning process change the color of natural thread? No
2) Should I sew before or after I apply the vinegaroon? either way - your choice
3) For the 'rooning process, how do you apply it? Dip the item, dauber it on, brush it on, etc? Could the vinegaroon be kept in a spray bottle and sprayed on the item? all of the above - which ever way works best for you and the item you are working on. I prefer dIp dying since it is simply the easiest for me, but I also brush it on for larger pieces - a spray bottle should work fine, but you would need to filter it good to prevent any clogging.


[First published August 15, 2015]