Showing posts with label General Advice. Show all posts

Thursday, June 10, 2021

Darkening

 MYTHS:

  1. If you store leather in the dark, it will not darken.
    Well, it is not light, or sunlight, or UV light that darkens leather.  
    It is air - oxygen - it is the tanins in the leather that oxidizes with its contact to air, that turns a darker color.
  2. Oil makes leather darker.
    No, oil might accelerate the oxidation process.
    When all the tannins have oxidized, you can add as much oil as you want, the leather will not go darker.
  3. Leave leather in the sun to make it go darker.
    Well, it might just accelerate the oxidation a bit, but it is still oxidation that darkens the leather.
  4. Saddle-Lac, NeatLac, Resolene will prevent the darkening of vegtan.
    No, all it might do is temporarily seal off the leather fibers from the air around it.  As the finish wears through and the fibers get exposed again, they will oxidize once more.

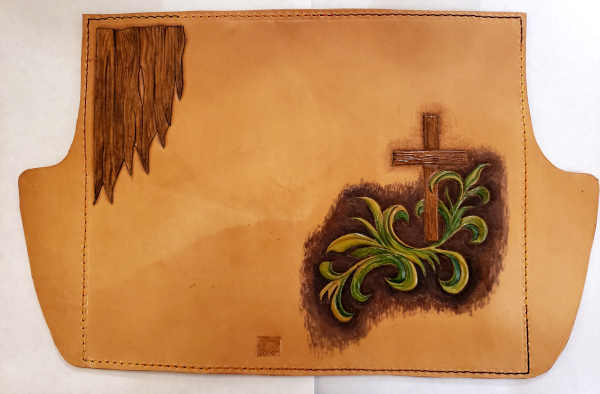
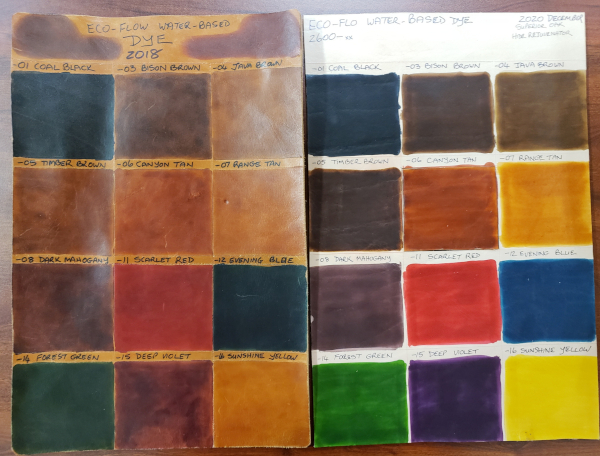
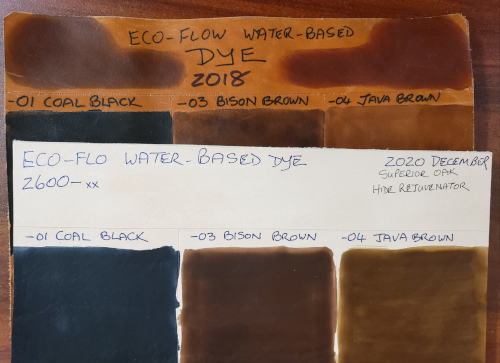
Here is an example of two sample sheets made about two years apart -  you can see how much the leather oxidized under Resolene.  The newer one will oxidize too, but nobody can say how much - that will depend on the recipe used to tan the leather - the more tannins, the darker it will oxidize.


Long ago in a guild we experimented with a complete UV light blocking finish we got from France.   It was a bit slower, but the leather with that finish on, still turned darker.

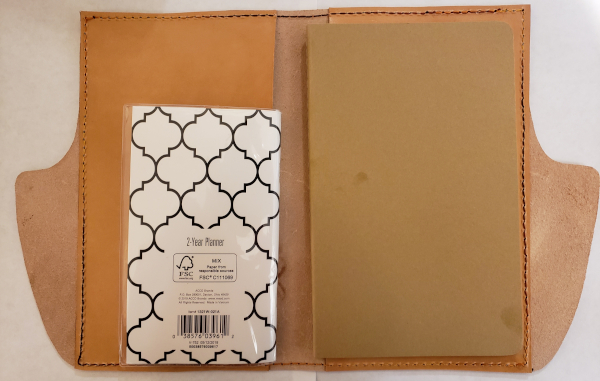
Then one day I saw a kit that had been hanging at the very back of a peg on the wall at a Tandy store.   The leather of the kit was the normal light color you expect in a vegtan.
Except for a very small round spot that had darkened - it was right next to s small hole in the plastic.   The leather darkened only in that one little spot.
This made me think that it was not light that had any effect - that whole piece of leather was exposed to the exact same amount of light.   The only difference was the exposure to air.
I asked the question on the forum of the Leather Chemists of America, and they confirmed for me that it is oxygen that oxidizes the tannins in the leather that makes for the darker shade and not light.

There is an interesting aspect to this:
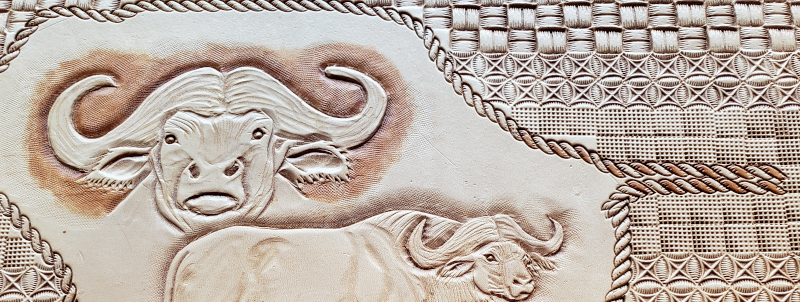
When leather is exposed to sunlight for too long, it bleaches to a very light unnatural color.
And the moment you touch that leather with water, it immediately gets to its darker oxidized color again.  
You can see that on this sign that hung in a store window for a long time and got afternoon sun every afternoon.   All I did around the buffalo head was to paint it with clean water (and when I took this picture, that water had dried totally).


Sunday, January 24, 2021

Pattern Transfer


In a discussion on how to prevent leather from stretching while you tool it,  Laurie Sackman-Lewis mentioned the product you see in the photo.
She said that she also uses it to enclose a design (laminated) so that you can just trace it.
I had to try and it worked well, so I made a quick short video to show how this can be done:


I hope it helps!
Thanks again Laurie

Wednesday, October 28, 2020

Getting Leather Soft


There is not a single product that softens leather.
And dyes, alcohol or water based, do not stiffen up leather. 
 
Let me explain: 
Think of this in terms of the leather fibers - kind-of like the fingers of your two hands interlaced.
When you get the leather wet to tool or form it or dye the leather, and while the leather fibers are limp, the leather is pliable. 
Now as the leather dries, the dye, and to a lesser extent the water, makes the leather fibers sticky, they stick to each other, and when it is dry, the leather feels stiff. 

Many people confuse this stiffness with "casing and/or dyeing dries out the leather".  You will hear often that alcohol based dyes "evaporates the oil from the leather".  [The oil/fat have already be taken out of the leather by the tannery - that is why you can case it and dye it.]

 Now you put oil, a sealer, or conditioner on and nothing changes....!?!?! 

The fibers still stick to each other because of the dye, and maybe now also the sealer. 

BUT, as soon as you start manipulating and bending the leather, the fibers break free of each other and the leather becomes softer. 

If you had applied a conditioner like dubbin or Aussie or Neatsfoot oil, the fibers that break free from each other, get lubricated and the leather feels even softer because the fibers now also get lubricated. 

 I hope this helps!

Published Aug 2016
Updated Oct 2020

Monday, October 26, 2020

Journal Cover

These are fun to make, are not a lot of work and make very nice gifts (any time of year is a good time to stock up on Christmas gifts!).

The insides can be any bound journal - I prefer Moleskin journals.

I want to introduce you to a unique shape I developed for the journal covers.

This is what it looks like from the front:


The "wings" that you see on the right are there for a very special purpose:  they hold whatever fastener you want to use for the journal.   Many people make journals that has string tied around them - often fastened to a button that is on the front of the cover.   What I dislike about most other methods that I have seen, is that the journal cover does not lie flat when you want to write in it.

I use snaps on those wings, and that way there is nothing bulky on the front or back of the journal cover to prevent you from writing on a flat surface.


This design also allows a handy space to slide a pen into.

On the inside I stitch one or two sleeves into which the outer cover of the journal can slide.  In the photo you will see this one has two sleeves - one on the left (the front of the cover)  and one on the right (what will be the back of the cover).   In the photo you will see the smaller easy-to-remove diary planner I was asked to make space for.

The size of the sleeves should also be noted - they are made almost as wide as the journal page.  Again, regardless of whether you are writing in the back or front of the journal, you will have a flat surface behind your page, and not a ridge where the sleeve ends.


I do make the sleeves of the thinnest leather I can lay my hands on so as not to have too bulky and end product.

If I have a sleeve only on one side of the cover for a single journal, I only stitch on that side, but nothing prevents you to stitch all round as I have done here (I had to because I have two sleeves inside).


Here is a video to help you get to the size for your own sized journal:


Friday, October 2, 2020

Acid and Acidity

I posted these questions to the Leather Chemists of America:

  • Is veg tan less acidic than chrome tan?   Holster makers believe this to be true - they avoid chrome tan against the metal of fire arms and report that they have seen pitting of the metal with prolonged storing.
  • Can an acrylic finish on chrome tan give it enough of a barrier that the acidity will no longer be a problem?
  • Can you simply rinse vegtan in calcium carbonate to neutralize it to a pH of 7?
  • I hope you do not mind a 'leather user' joining this forum, but I find so much useful information here! And I would like to use the knowledge I pick up here, to educate as much of us as leatherworkers as I can, as to the proper care and use of leather!

Here is a compilation of the answers:

"The common pH scale is from 0 to 14 with 7 being neutral. Below 7 is acidic, above 7 is basic or alkaline. The hair is removed from a hide with lime and sulfide which produces a pH above 13.

That is extremely alkaline. However, this condition is then transformed into an acidic state for most tannages. It is tempting and almost accurate to say that all leather is acidic, but there are some minor exceptions which do not normally apply to commercial leathers.

Before tanning, chrome leather is pickled in acid lowering the pH usually to 2.5 or lower (very, very acidic). After tanning the pH is raised to around 4 to set the chrome (actually it is the tanning step). In vegtan leather, the process for tannage is a lowering of the pH to set the tannins, but again the target pH is about 4 (a little less these days). Of course these are all wet processes and not the final pH of most leathers.

In chrome leathers the pH may actually end up much higher than in vegtan, but that depends a lot on the coloring (dye) process which is often the last wet process. If a heavy dye must be set, say black, often a lot of formic acid is used to fix that dye, so once again the pH may easily drop below 4. However, it is not just the acid that causes this leather to be very corrosive to metals, it is also the salt and the chrome itself which catalyzes oxidation of metals. Typically vegtan leather is very low in salt, as well as tannins being anti-oxidants.

Personally, I would want a Mossback, lining or other barrier between my gun, metal frame glasses, knife or other metal object stored in a leather protective or carrying case, sheath or holster, but I tend to be a little over the top. Certainly acrylic could do the job if applied adequately. Obviously, in the real world where naked leather is in contact with swords, guns, knives, eye glasses, etc., very routinely, little real damage is commonly seen.

If one would buy leather with low salt, low acid content and proper lubrication for this application (gun holsters) there would be little reason to be concerned. For chrome leather this would probably include a good, soft retannage in order to modify the surface. A good example would likely be found in military specifications for leather used in such applications. However, I have barked up this tree enough to know that no one is willing to hear the story. They just want to buy a piece of leather and go. So if they are wise enough to be concerned, tell them to check out Mossbacking and just use a similar gum, plastic or lining that they know to be non-corrosive.


As to dipping vegtan leather in carbonate of soda.....NOT A GOOD IDEA! This will raise the pH just fine, but that will de-tan the leather. Even de-tanning the surface is not a good idea.

Chrome tannage creates lots of salts in the leather! Sulphates between charged aminos and sodiums as the counter ions, for instance. The fact that most tannages are produced by water-born chemistry, yields a certain corrosivety to leather towards metals.

Vegtanned leather strap was also classically used for the evening-out of freshly sharpened edges of cutting steel, thus artisans feel that vegtanned leather is a natural companion to a sharp cutting instrument. The truth is that most tannages release acids from collagen, or associated materials like phenolic resins present.

My suggestion for cases made of leather is that they should breathe well for moisture release but should have a dry breathing film, water-barrier against the metallic surface being protected and enclosed in the case. I would suggest that the thinnest would be made by a water-emulsified nitrocellulose (Hydrolacker) application on the surface touching the metal, and nothing else! Moss-backs that consist of waxes and protein combinations could be OK, but acrylic resins (paint without pigment!) is too good a water vapor barrier and thus might actually aid galvanic corrosion by helping conduct electric currents.

I maintain that the corrosion of a metal surface is normally occurring through a water containing media, and hence breathe-ability in order to dry-out, is an important characteristic to cases made of leather. I hope this is useful and that the forum helps you."

Friday, August 30, 2019

TIPS: EVERGREEN ADVICE

From a flyer of the Headwaters Leather Guild - 2006:

(I will add my own personal notes in green)


TIP 1 

Always treat your newly bought veg tan leather surface with respect - even air exposure, no moisture, no oil, no fat. Wash your hands before you handle the leather - sweaty fingerprints may only become visible when you add dye or the final finish.


TIP 2

Roll leather up with the grain side on the inside - the other way round will cause the grain side to stretch (slightly) and when you straighten the leather, it might wrinkle.


TIP 3

Rolls of leather can easily be stored in PVC pipe lengths with a diameter of 8" / 20cm or more.  Another reason or rolling the leather with grain side in - the nice grain side will not scrape on the pipe edges.


TIP 4

When you start wetting leather for tracing and swivel knife cuts and tooling, make sure to always wet the full surface of the leather. If you do not, the water will rinse chemicals to the edge of the wet part and as it dries, that will show as the edge of a waterstain. (These stains can be treated with excessive washing with a lot of water.)

If I work on a very large piece, I wet the part I am working on with a sponge and then now and again just keep the rest damp with water from a spray bottle.


TIP 5

OIL and WATER do NOT mix.

During the following steps in your project, no oily of fatty substances or containers with finishes in or hands with all of the above on, should be allowed close to your workbench: Cutting, Tracing, Swivel Knife Work, Tooling, Dyeing.

After doing these, you treat the leather with a conditioner / sealer / finish and now you cannot use water on the leather again easily - the leather finish you use should protect the leather against water and against the rougher treatment of construction.


TIP 6

Wet leather and Ferrous Metals Do Not Mix


These metals will stain leather black when it touches even just damp leather. That means that you .......


a) cannot weigh down leather with metal weights, without first covering them in leather or plastic.

b) cannot have metal filings on your workbench - so be careful after you have sharpened knives where you will later work with damp leather (it takes seconds for the stains to be caused).   The stains of fine metal dust will appear to look like mold spots on the leather.  So also wash your hands after sharpening knives and before you work with wet veg tan leather.

c) cannot casually let metal tools lie on damp leather.

d) cannot use metal clamps to hold leather in position while drying - glue some small pieces of leather on the inside of clamps you want to use on leather.


TIP 7 

When you spill coffee or Coke on a project, immediately take it to a basin and empty the rest of the offending liquid over the the project to cover it completely (and therefor stain it completely and seamlessly and uniformly).  Then rinse it off with clean running water.

[Do not follow this tip when you spill blood on your project    -     ðŸ˜€ ]


TIP 8

Always use the cut off pieces of leather to test water absorption, tooling softness, color effect of dyes and the effect of finishes you want to use. Also test out stamping patterns you might consider or any new tools you buy.

I wrote more about it here:

ALWAYS TEST

Remember that tools with a large footprint, will take a lot of force from your mallet to make an impression, while a small surfaced tool like a seeder, will only require a light tap.


TIP 9

To test the effect of a certain finish you want to put on leather, use it on a little cut off piece that was stamped/carved and dyed the same as your project and then carry it with you all the time in your pocket (with your keys).   Ladies can do the same in a bag or wherever it will receive rough treatment.

This will give you a good idea of how the leather will keep, and how the finish will protect it.


I hope this helped!

Sunday, April 14, 2019

Leatherwork and your Perception

Have you ever finished a project and thought to yourself :  "This is not too well done - shoot!     So many mistakes...."? 

Don't beat yourself up! Your work is beautiful! Even if you are a beginner!

It is just a fact that before you start a project, you have an idea and image in your mind as to how it will turn out, a VERY idealistic idea.   

Then you see the finished project and it differs from that image in your mind - your mind turns that into mistakes / short-falls.

YES, there is ALWAYS room to learn and improve - after 42 years I still learn to do things better / different / in new ways.   

Don't be phased by criticism by leatherworking veterans - they are probably only trying to help.   

More important is that you do not get phased by your own criticism!

Almost all leatherwork looks good to non-leatherworkers.  Keep that in mind.

Many years ago, when I was still a beginner, I made my cousin a handbag  -  I thought the work was mediocre.  

After about four years I saw the bag again for the first time, and my words were:  "Wow!  who made that for you - it is beautiful!"

She looked at me funny and said "You did!"   Then I realized, your work is better than you think.

While you work on your project, you notice every small little imperfection in your work.   In your mind these grow very big, because you are busy with the project close-up.

Teach yourself to put the project down at the end of the day and clear your brain.  Then the next morning, look at it as if someone else did it.   You will slowly develop the ability to look at your work more subjectively.

I hope that helps!

[Updated October 2020]

Wednesday, August 15, 2007

Fuzzies

Well, I mean the often fuzzy 'under' side, or flesh side, of veg tan leather......

There is some people who think that a smooth backside to the leather means a higher quality. A smooth back (flesh) side of leather is merely achieved in the tanneries when they split the hides to get them an even thickness.

However, often it is nice to have the back of your project nice and smooth, a belt, for example.

There are a few ways of doing this - here are the two methods I use most often.

If you use Eco-Flo Water Stain (the one in the square bottle) on a belt or project, use the stain on the back as well - it will slick down the flesh side beautifully and should not bleed off on clothes after you have sealed it with a finish. I have carried a piece of leather with this Pro Stain on both sides - no finish - in my pants pockets for a year and there was no bleeding at all.

Second method:

Get hold of Gum Tragacanth. You can apply that a little at a time and rub down the back of the leather with an old spoon. To smooth it down even more permanently, you can then cover the back of the leather with Super Sheen - an acrylic product that will effectively seal off the back of the leather.

Both these products are available at your local leather supply store or they should be able to order it for you.


Fuzzies

The belt piece before anything is done to it - you can see the typical loose fuzzies on the back.

Fuzzies


After the gum has dried on the leather you can see the difference between the covered part and the untreated part.

Fuzzies


This is a very upclose of the treated back side of the piece of belt.

This post from August 2007 has been updated. The gentleman in the videos is my long time friend and mentor, Larry Moskiewicz