
One of the processes to get sharp tools to work at their optimum, is to polish them. This is not sharpening - it comes after the process of sharpening.
Here is a video that will show most of the often used tools being polished.
A lot can be said about swivel knife preference and quality, etc..
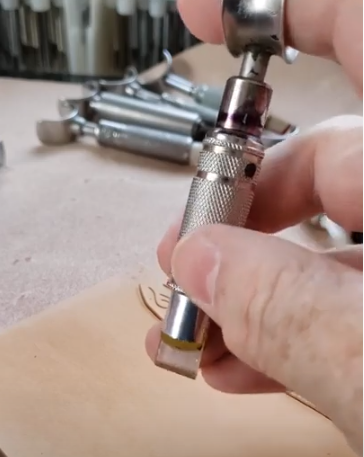
First off, lets make a difference between a sharp blade and a polished blade:
This means that sharpening a blade is seldom necessary. I used my first swivel knife blade for more than twenty years before the stropping so deformed the shape that I had to put it on a grind stone and just reshape it again.
When you buy a new blade, here is what I suggest you do:
I hope this helps - please contact me if you have any more questions.
Published Aug 2015
This is a list of custom leather stamp makers.
It is in no particular sequence and I am neutral about all of them.
1. Sergey Neskromniy - Etsy Shop
2. Tack Templates - Website
3. Jeff Mosbey - Grey Ghost Graphics
4. LeatherStampMaker - Website
5. Steel Stamps Inc. - Website
6. Gelandangan - Australia - Website
7. WarBonnetTools - - Website
8. SixElementWorkshop - USA Northwest - Website
9. Custom Leather Stamps - Etsy Store
***
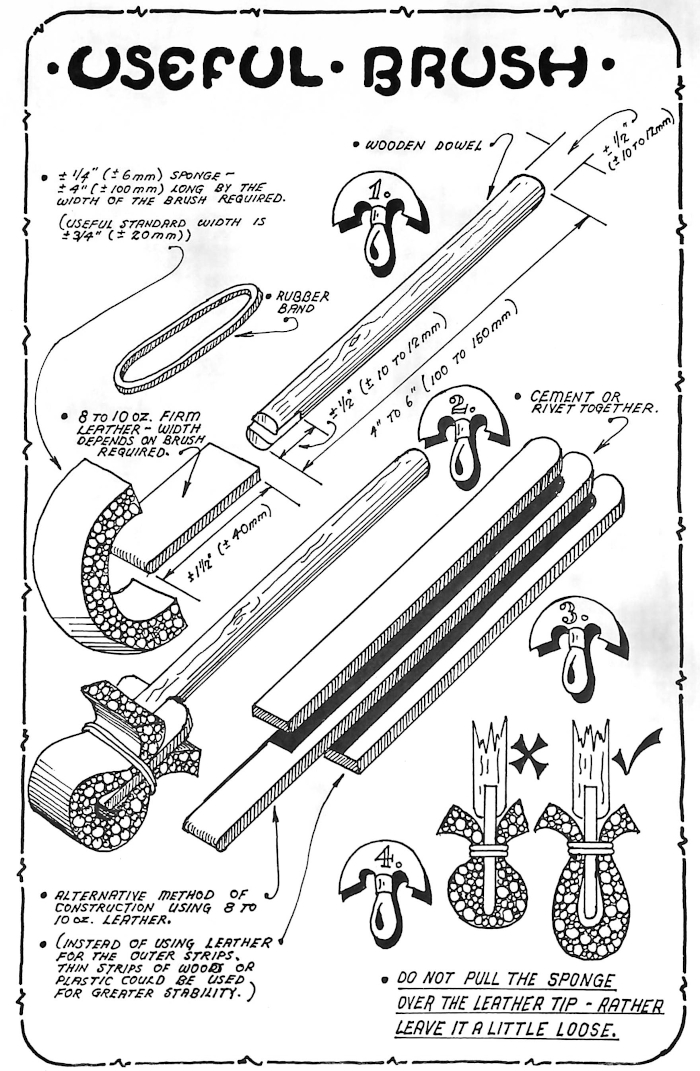
A USEFUL BRUSH WITH A DISPOSABLE TIP INTENDED FOR GENERAL LEATHERWORK
As may be seen on the attached illustrations, the main working component of the brush is a strip of sponge held in place with a rubber band. This type of brush has many advantages:
it is very cheap to construct, and to use;
it is very convenient in the sense that after use, the sponge tip need not be cleaned in a suitable solvent, it may just be removed and discarded;
sponge is a far better medium for putting on dyes, stains and other colours onto leather;
and there is no danger of any hairs coming loose from the brush.
CONSTRUCTION:
In figure 1 the components of the brush are clearly illustrated, and figure 2 shows how the components are assembled into the complete brush.
The dimensions given are general dimensions, and you must use dimensions that are suitable for your purposes.
I personally prefer to use a wooden dowel for the handle, but the brush may also be constructed, as shown in figure 3, using firm 8 to 10 oz leather, either cemented or riveted together.
Instead of using leather strips on either side of the central leather core, strips of wood or plastic may also be used.
The handle is not discarded each time after use, and a little more time and effort should be spent on the construction of the handle.
The working tip, and most important part of the brush is made of normal sponge, 1/4“ <6mm> thick, and about 4“ <100mm> long, held over a firm but flexible leather core with a normal elastic band.
The width of the sponge depends on the purpose of the brush required, however, I have found that 3/4" <20mm> is ideal for general purpose leatherwork. It is a good idea to make a few brushes with widths that you personally find useful in your leatherwork.
When the sponge is fitted to the flexible leather tip, it must not be pulled tightly over the leather. The sponge should be a little loose, and not compressed at all. Should the sponge be compressed, it will work well, but it will not hold any appreciable amount of dye.
USE:
The brush is used the same as any normal bristle brush, but in my opinion, the finish that is achieved with the sponge is far better than with a normal brush, and it is much easier to use. The sponge holds as much colour or stain as a bristle brush, but the sponge releases the colour in a much more controlled manner, thereby giving you a much more even spread of colour or stain.
There are circumstances where a firmer sponge may be useful , especially when colouring the edges of leather belts etc., and a few brushes with narrower tips, using a firmer sponge, if available, should be made.
There is nothing against using normal sponge for colouring belt edges etc. - all that must be remembered, is not to press the brush too firmly against the leather edge.
I have spoken to certain other leathercrafters and they prefer not to clean or replace the sponge of the brushes each time they use it for the colouring of belt edges. They rather let the dye dry completely on the sponge after use, and when they use the brush again, the firmness of the sponge due to the dried dye, is ideal for the colouring of subsequent belt edges. The normal solvents in the dye does soften the brush a little, and this is just enough to enable the sponge to hold dye, but the sponge still remains firm enough for the accurate colouring of belt edges.
The biggest advantage of this type of brush is that the sponge tip is entirely disposable after use. There is no necessity to clean the brush with suitable solvents etc. after use. Simply remove the used sponge and rubber band by pulling it down, and off the leather tip. Replace the tip with a fresh piece of sponge and rubber band.
So as not to get any dye on your hands when removing the sponge, simply put your hand in a small plastic bag, remove the tip with that hand, and then pull the bag inside out over the used sponge and discard the plastic bag and its contents.
Keep a supply of pre-cut sponge strips for the various widths of brushes that you will be using, as well as a supply of small plastic bags and rubber bands available. This will prevent you having to cut a strip of fresh sponge each time, and to hunt for a small plastic bag and rubber band, each time that you need them.
---oooo0O0oooo---


The above is my box of starter tools from 1978.
It is not for sale - you don't have enough money.
And it is NOT the starter set of tools I am going to recommend in this blog - you will have to read further down....
This post is going to be a continuous effort to advise new leather crafters. I will first discuss the very basics, and then go on to a second tier of tools that can be expanded to.
The tools that will work well for each person will vary a bit depending on the projects that you mostly engage in. I am going to focus on working with vegtan, or tooling, leather.
I see the surface of vegtan leather as very vulnerable, until you have it sealed or conditioned.
So I never bring pen or even pencil close to the leather surface (not even greasy hands). Therefor all the marking I do, is done with a scratch awl. The photo below shows a big red handled one I used until I acquired the small model, that is still available.
With the scratch awl you can easily trace around templates, poke holes where your pattern indicates holes to be punched and you do not have to be scared that ink will smear in places where it can ruin your project.
I seldom use the big red one any more and do most work with the smaller one.

There is a gazillion cutting instruments out there with a gazillion and ten opinions about what works best.
But let us focus on starting out. The breakoff blade knife at the top of the photo is the one I started off in 1978 - it is semi retired now and just used for the sake of sentiment. The second white one, also with the breakoff blade is new at Tandy. This is my absolute go-to knife for the following reasons:
There are other breakoff blade knives available - the one I bought at a hardware store however, had a too wide opening for the blade and so the blade would "flap" from side to side and make accurate cuts difficult.
The third knife in the picture is a recent gift from a good friend - it is a very old knife with a removable blade. The blade has the same shape as the other two, which makes it easy to cut with and I almost have it honed to the point where it cuts soundlessly, and as if it is going through soft butter! It will have to be stropped regularly to stay a joy to cut with.


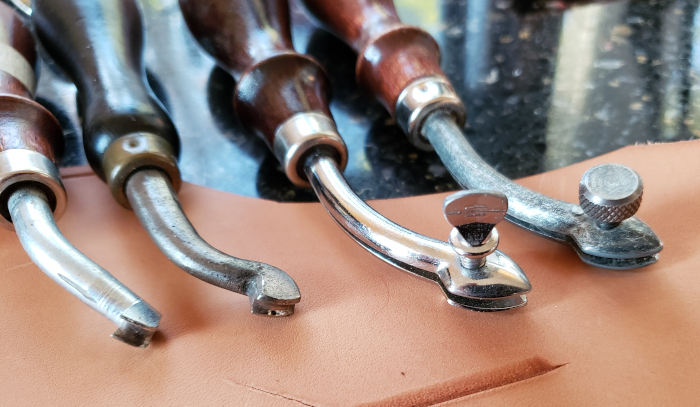
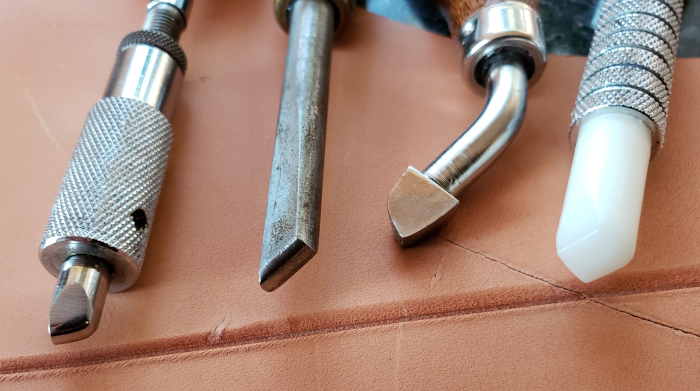
I don't want to say too much about how to use the tools - that is probably a few separate posts - just what they are for. The compass has two fairly sharp metal tips and is used for drawing lines parallel to edges. This has various purposes.
On the photo and edge beveler at the bottom - used to round off the square 90 degree corners where leather was cut.

The other two tools - slickers - are then used to smooth the edges of the leather. The plastic circle has been around for a very long time, but the multi sized wooden one is the only one you need to start with.
Edge burnishing is quite a science / religion with many leatherworkers, often with impressive results, but if you master the basics first, you will continue to get good results.
Many projects require holes - for rivets, snaps and other hardware attachments.
To start I propose a set like the one shown here - a handle into which your screw the tip you desire, depending on the hole size.
The advantage of this set over a revolving head hole punch is that with this you are not limited to a throat depth (with the pliers-like tool you can only punch holes about inch and a half from the edge or less).
It is also cheaper, because if you do want to get a revolving head hole punch, you need to buy the top end solid steel handle punch - the lower end models will only last if you do ten very careful holes a year....; the frames of those tend to bend easily.
Also note the accompanying plastic cutting board to use underneath the leather when you punch holes through. To do this on wood would dull your punches very fast.

And I think that concludes this post! I will start a new one looking into the starter tools for tooling and a different one for starting with lacing and stitching.
I hope this helps!


