Sunday, January 24, 2021

Resist and Antiquing

 I did a test to show some of the options with resist and antiquing. 

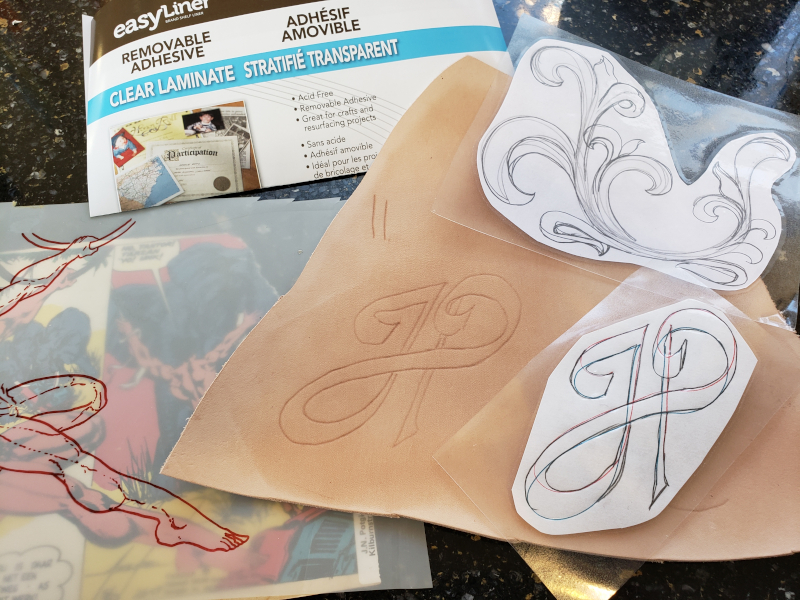
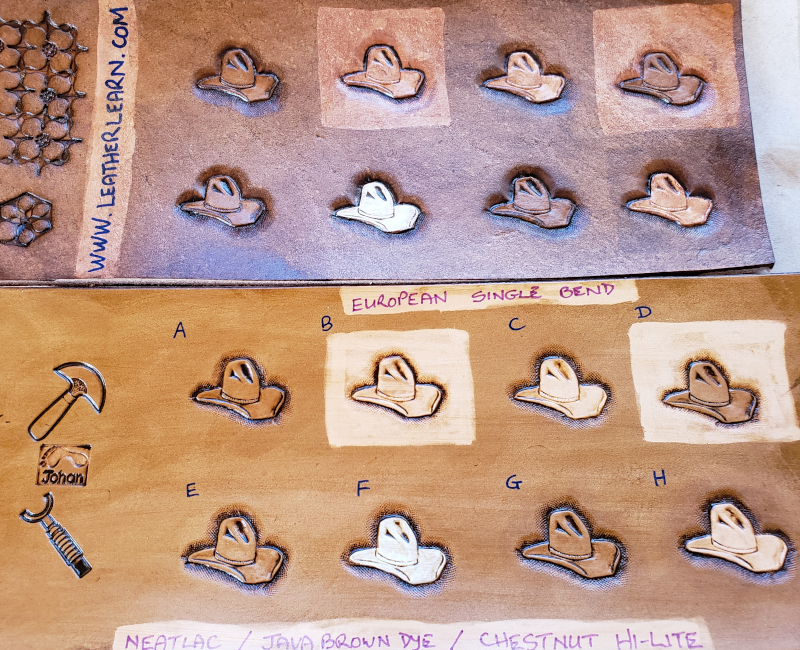
This photo shows my preparation for the process:


I first stamped the top piece of leather with the hats and slightly beveled around them.

Then I applied Neatlac in specific spots as I will soon explain.  Those areas stayed dark, even after the Neatlac dried, and I realized I would have to do the same on another piece of leather that was tanned differently.  You can see the difference in the effect of the Neatlac.  I did the same on both pieces, so when I refer to "B", it is the second hat from the left in the top row, on both pieces of leather.

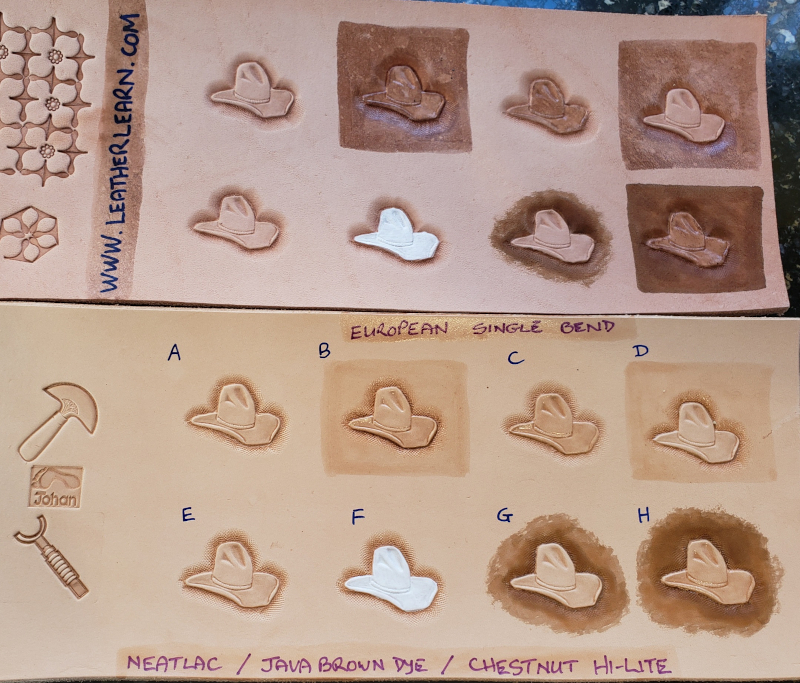
A:  No resist, no dye.

B: Both hat and background resisted.

C: Just the hat is resisted with the Neatlac.

D: Only the background is resisted.

E: No resist, no dye.

F: Hat painted with white acrylic paint

G: Background dyed with Java brown water-based dye.

H: Background dyed and hat resisted.

After this, the Hi-Lite stain was applied:


Here is the result:


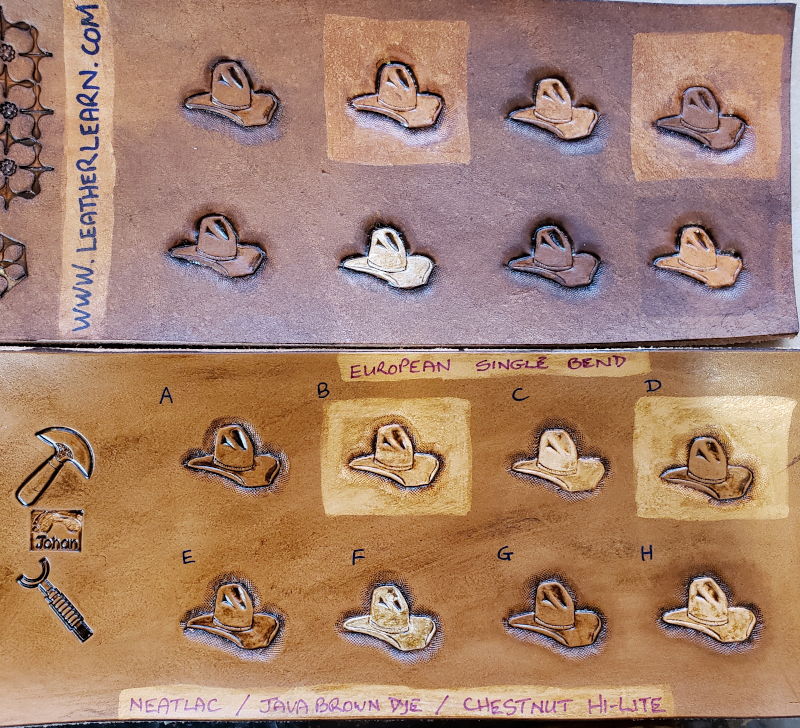
On both pieces the background dye around G and H almost completely disappeared - I think the Java brown dye and the Chestnut Hi-Lite colors were too close for the dye to show through in contrast.

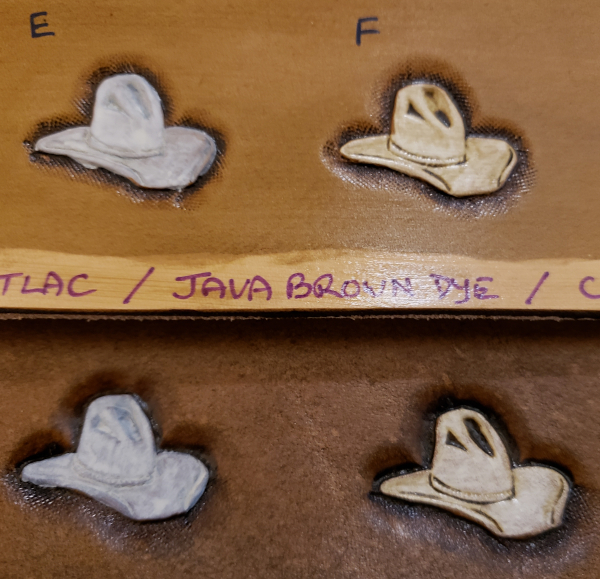
And here is a quick tip:

After applying Hi-Lite stain, you always have to seal it in, because the stain leaves a residue on top of the leather.
If I am happy with how my project looks at this stage, I will often simply spray it with Leather Sheen aerosol - goes on shiny and then after five minutes you cannot even see that it has been sealed. 

In this case however, I wanted to get the Hi-lite stain off as much as possible and also make sure that the color was on as even as possible.   To do this, I applied the Neatlac with a sponge as you can see in this video:


All that remained now was to apply white acrylic paint to the hat in E.  In this case it was not very successful, but with things like flowers, it is often nice to get a bright color going on top of the Hi-lite stain.  I prefer option F where the Hi-lite stain slightly dulled the white of the hat, but you can see how much contrast there still is.

 The final result is as follows:

So I hope you can now see how you can use different pathways to achieve different results.

*

Pattern Transfer


In a discussion on how to prevent leather from stretching while you tool it,  Laurie Sackman-Lewis mentioned the product you see in the photo.
She said that she also uses it to enclose a design (laminated) so that you can just trace it.
I had to try and it worked well, so I made a quick short video to show how this can be done:


I hope it helps!
Thanks again Laurie

Monday, January 4, 2021

Cracking Leather

 Stop Leather from Cracking

"My leather cracks when I fold it after dyeing.  Help!!"

This comes up often as a problem - here is my take on the issue:

First Question:   Are you using the Eco-Flo water based stain from the square bottle?
If you are, please read this blog post (it covers the two important secrets in using this stain - shake and long application):

Next Issue:   The dye changed to very top layer of the leather.   This will take some explanation.

If you aggressively fold leather as it comes from the tannery, the outer layer will probably stretch enough so that it does not crack.

Now think of the leather fibers as the same as the hair of a paintbrush.   Easy to bend over, until you use it in paint and you do not wash it.   They dry very stiff and hard.

Exactly the same happens to the leather fibers that you dyed.   People think it is the dye that dries out the leather, but you start off with dry leather.  It is now the leather fibers that stick to each other.

To solve this problem, there are a few things to consider:
  • You can bend the leather while it is damp and the leather can stretch more.   This can be when it is still damp from the dye, or you could get the whole piece damp again.
  • You can treat the leather with a conditioner such as olive oil, neatsfoot oil or any of the waxy greasy conditioners out there.   After it has penetrated the leather, manipulate the leather to give the fibers a chance to work them selves loose and become lubricated.
  • Not all leathers are tanned with the same recipe - some may easily accept an aggressive fold and some may crack just because of the way it was tanned.
  • The thicker the leather, the further you expect the outer layer to stretch, which could also be a factor.
Keep these points in mind and test with cut-off pieces what works best for you.

There is a lot of opinions out there about oil and dye / before and after.  You have to be VERY careful with this advice!!!       Please read this:

I will add to this post as I think of more things.
Have Fun!!!


Saturday, January 2, 2021

Cutting Straight


Yes, I know:  you have cork under your ruler.....

BUT.....Cutting against a metal straight edge will work well, until you cut a big piece for an expensive project.
And then the straight edge will slip and you will cut into your project leather......     [Learning from a friend...]

So I suggest this:
Use a ruler / straight edge and a scratch awl to mark the line where you want to cut.  Then make the cut freehand!

Because during the marking phase you can focus just on keeping the ruler straight.   Then when you do the cut, you can just focus on that and do not have to worry to also keep the ruler stable.

Here it is in action:


Saturday, November 7, 2020

Water Stain

 Using Eco-Flo Water Stain (the one in the square bottle)

Probably one of the top stains on the market today for the leathercrafter. To understand how to properly use it, I want to quote what was on the Tandy Website in 2019:

"It’s a blend of natural and synthetic waxes, dye-stuffs and binders with high penetration and dyeing power. This stain will not bleed or rub off. Colors can be mixed to form different hues. It can also be thinned with water to reduce intensity."
BUT, it has to be applied properly to be effective. Remember also that it was developed as a stain to color large areas of leather. 

It is important that the leather is dry before you apply the stain.  Damp or wet leather will give unpredictable results:

However, I have used it very successfully with a small brush in selected areas only, by staying in one spot for a long time.


One of the most important points for getting good even coverage on the leather:
 
Shake the bottle for five minutes, have coffee and shake for five minutes more.... 
 Then spend at least two minutes applying the stain with a sponge. 
 It will go on super dark, dry very light, and then pop when you apply a conditioner or sealer.
Published Mar 2019

Friday, November 6, 2020

Stropping a Swivel Knife

First off, lets make a difference between a sharp blade and a polished blade:

  • Almost all blades are manufactured as "sharp" blades - that is, they come with the correct angles to their blades - roughly a 48 degree combined bevel as shown in the illustration below.
  • A polished blade is where those beveled edges of the blade has been stropped and polished to remove TWO things - the grinding marks from when the blade was manufactured and secondly the residue that builds up on the blade from the leather.


This means that sharpening a blade is seldom necessary.  I used my first swivel knife blade for more than twenty years before the stropping so deformed the shape that I had to put it on a grind stone and just reshape it again. 

When you buy a new blade, here is what I suggest you do:

  • Spend at least half an hour stropping / polishing the blade as shown in the following video (card board with jeweler's rouge on it works just fine).
  • Then you can start with it on the leather.
  • Every time you pick up your swivel knife to use it, strop it for a few minutes.
  • If you do a lot of work with it, strop it every five minutes.   
  • After a while, you will get the feel of a blade that is gliding through the leather as if it is cutting through butter, and a blade that "stutters".  As soon as it cuts with jerky movements, you know it needs more stropping.


  I hope this helps - please contact me if you have any more questions.  

Published Aug 2015 

Thursday, November 5, 2020

Dubbin

The Ultimate Leather Finish / Dressing Any Leathercrafter can Use! 

I have successfully made my own Dubbin: 
I rendered sheep fat for the tallow (beautiful white stuff - also good for cooking and preparing cast iron cookware), and then I added Beeswax and cod liver oil (or Neatsfoot oil), lanolin and glycerin. 
The result is all I expected and I do not feel anxious any more about having to import my Dubbin from South Africa!

Etherington & Roberts says it is made of tallow and cod oil. Thelma Newman, in her book "Leather as Art and Craft" describes DUBBIN as a mixture of Tallow and Cod liver Oil.

I suspect Dr Jackson's Hide Rejuvenator is very close to Dubbin.  Also Colorado Leather Balm, made from beef tallow.

Why I Like DUBBIN so Much!
  1. DUBBIN feeds and protects the leather from the inside and replaces all the oils taken out of the leather during the tanning process.
  2. DUBBIN brings out a deep glowing color in leather. In un-dyed leather it will cause the leather to turn a golden honey color when exposed to light.
  3. DUBBIN is very good for your hands - especially in winter. I always apply it by hand - it allows me to regulate exactly how much I put on.
  4. DUBBIN never accentuates stains on leather - it rather tends to clean up any water or light stains.
  5. DUBBIN Can be used over any dye or finish, such as spirit dyes and water based dyes as well as water based inks.
  6. DUBBIN allows leather to become supple without loosing its shape - it helps the leather to stay "alive" and always as beautiful as new.
To Make Your Own 

Here is my suggested quantities (I vary them every time I make a batch - just like grandma used to bake with a handful of this and a pinch of that.....):
  • 1 kilogram lard [2 lb] - I prefer sheep lard. It has to be rendered - cut it up and boil it in water until the lard separates out clear from the water and gunk. Pour it off so that you can let it cool off and solidify.
  • Less than 100 grams of beeswax [1oz or less]
  • 1/2 liter of Cod Liver Oil [16 fl oz].
    If the thought puts you off, replace it with Neatsfoot oil or olive oil, in fact, any plant or animal oil, but definitely not a mineral oil (that will attack your leather).
    I have doused a piece of leather in Cod Liver oil - it smelled fishy for four hours, and then the oil and leather started to talk to each other and all that was left, was a very traditional leather smell.
     Cod Liver oil used to be a very traditional oil used in working with leather and some ascribe the very romantic smell of the previous century car interiors and saddles and leather goods, to Cod Liver oil.
  • 60 ml of Lanolin [2 fl oz]. I have found pure lanolin sold in pharmacies for use by breastfeeding mothers.
  • 60 ml of Glycerin [2 fl oz].
Simply melt them together gently - the result should be creamy and easy to apply to leather. 

Answers to DUBBIN critics: 

It is sometimes said that DUBBIN rots stitching on leather articles. 
When applying DUBBIN you must simply make sure that you do not leave chunks of Dubbin in folds or seams of the leather - this will collect dust, trapped by the thick DUBBIN and the dust will then rot the stitching. 
I always polish a project that I have just applied DUBBIN to, with a soft brush - there seems to be some beeswax in DUBBIN that will cause the leather to have a natural shine when treated like this. 

I posed the following question to the Leather Chemists of America:
I make my own Dubbin as a leather dressing - mainly for veg tan. I am curious as to the ingredients I use and how meaningful they are (are they all necessary?) Beeswax Sheep Tallow Cod Liver Oil Glyserin Lanolin
I see on the ALCA dictionary that there is also mention of aluminum stearate in dubbin - what is its purpose and where can the-man-on-the-street buy this?
This was the answer I got back:
Each of the materials in your dubbin has a unique character and therefore imparts a special trait to the leather.
The wax protects the surface and adds that unique feel to the treated leather.
The tallow penetrates a little better, but also contributes to that waxy nature, but also has a lower melting point, so it changes more effectively when warmed slightly than the wax which remains solid to a bit warmer condition.
The fish oil penetrates deep and softens as well as providing anti-oxidant properties and even some tanning when heated.
The glycerin is a good humectant and keeps the leather from over drying by pulling moisture from the air.
Lanolin is also unique, though some folks are sensitive to lanolin and should always be advised that it is in the leather. This sheep byproduct has long been taunted as a great soften and water repellent for leather.

Clearly the amount of each of these materials in the dubbin can be a major issue, but that is something that I am sure you have seen with time and experience as you adjust your formula.

Aluminum stearate is just soap, though most would probably consider it more a grease than a soap. It combines a wax and humectant roll, but just as most leather experts warn against the use of saddle soap, I think you will quickly see that this soap really has little to offer your mix.
The biggest issue with soaps and leather is that soaps are made under highly alkaline conditions, and unless that basicity (alkaline pH) is neutralized it can carry terrible consequences to the acid leather.

 Published Aug 2016
Updated Jul 2017