Saturday, March 15, 2008

Borders

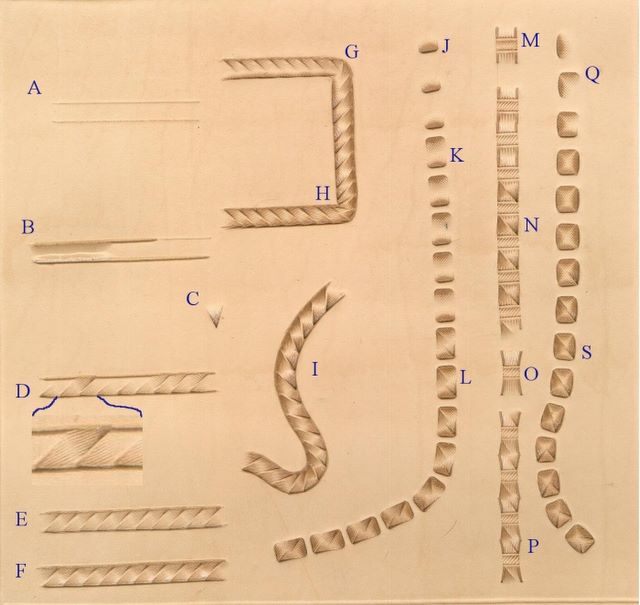
The Use of the triangle figure carving beveler F910 stamp can be applied to a few other very effective borders!

This is a different description to do the rope edge effect also covered in another POST (with a video).


So referring to the photo:
 
First begin by scoring two parallel lines with a divider. #A
Now cut carefully on those lines with a swivel knife. #B You can optionally also bevel the inside of the lines with a smooth or a textured beveler, as you can see on the left of the #B part. Alternatively you can bevel the outside of the rope when you are done with the rope itself.
All these border designs use lined stamp F910. #C
Now stamp a row of these ‘triangles’ against one of the cut lines as you can see in #D (the bottom line was done first).
To do the second line, in the opposite direction, study the enlarged piece to see how the tool is now lined up: one side of the tool is first lined up with the cut line (as in the first row) and the other side of the tool is lined up with the impression against the opposite line so that there is a slight ridge between them.
To clarify further - in the enlargement there is one impression at the top and three running in the opposite direction against the bottom line - see how the one impression in the top line up with the middle of the three impressions at the bottom.
As I indicated earlier, you can optionally bevel the two parallel lines after you have cut them with the swivel knife and before you start the stamping. Illustration #E was done without any beveling and illustration #F was done over beveled lines.
The border can be used very successfully around 90ยบ corners. I like to use the dividers again to score the lines I am going to use. When I reach the corner, I let the inside leg stand still while the outer leg does the radius around the corner.
As you can see in illustration #G, the outside edge is stamped first and in the bend of the corner, I tilt the tool slightly forward so that it makes a smaller impression and so that it does not overstamp the edge. Then when I work on the inside line in the other direction, I keep to the same spacing I did on a straight line: every stamp corresponds to another on the outside line and is spaced so that there is a slight ridge between the two.
You will find that this causes the impressions to bunch up at the very corner so that all the sharp tips are almost on top of each other and this is OK!
Illustration #I shows the success of this border on curved lines. Again the outside edges are stamped first up to the point where the lines may curve in the opposite direction. There I stop with that side of the border and first do the other side, which will now become the outside edge of the curve as I proceed.
Throw a checkered beveler in the mix and you get a few more possibilities for borders:

 The first of these designs start with a row of evenly spaced impressions with a checkered beveler.  #J 
 Turn the leather around and make impressions with the same beveler in the other direction.  This will have the effect of a ribbon woven through the leather.  #K
 Add diagonally opposed impressions with F910, and it now looks is if the ribbon is twisted as it is woven through the leather. #L

 The second border design shows a line of basket weave stamps used end-to-end:  two different stamps are shown for this at #M  and  #O. 

Now add The F910 stamp again in diagonal fashion and you have a whole new border to play around with. #N and #P 

In the third line you make little squares with a checkered beveler - I first stamped a row of them next to each other. #Q  Then I add the top and bottom sides of the little square and lastly the fourth side of the little square opposite to  the first side. 

At #S you can see the added effect of using F910 in opposite corners and at #T you can see how it changes when you use F910 on two side-by-side corners.

I hope you enjoy playing with this!

[Updated 04/26/2020]

Wednesday, August 15, 2007

Fuzzies

Well, I mean the often fuzzy 'under' side, or flesh side, of veg tan leather......

There is some people who think that a smooth backside to the leather means a higher quality. A smooth back (flesh) side of leather is merely achieved in the tanneries when they split the hides to get them an even thickness.

However, often it is nice to have the back of your project nice and smooth, a belt, for example.

There are a few ways of doing this - here are the two methods I use most often.

If you use Eco-Flo Water Stain (the one in the square bottle) on a belt or project, use the stain on the back as well - it will slick down the flesh side beautifully and should not bleed off on clothes after you have sealed it with a finish. I have carried a piece of leather with this Pro Stain on both sides - no finish - in my pants pockets for a year and there was no bleeding at all.

Second method:

Get hold of Gum Tragacanth. You can apply that a little at a time and rub down the back of the leather with an old spoon. To smooth it down even more permanently, you can then cover the back of the leather with Super Sheen - an acrylic product that will effectively seal off the back of the leather.

Both these products are available at your local leather supply store or they should be able to order it for you.


Fuzzies

The belt piece before anything is done to it - you can see the typical loose fuzzies on the back.

Fuzzies


After the gum has dried on the leather you can see the difference between the covered part and the untreated part.

Fuzzies


This is a very upclose of the treated back side of the piece of belt.

This post from August 2007 has been updated. The gentleman in the videos is my long time friend and mentor, Larry Moskiewicz


Wednesday, July 18, 2007

Resist

USING RESIST

 I had this request: "I have been using block-out to keep my dye out of what I have stamped, but I can't get it to resist. Please help me with my leather resist problem."
[Block-out is unfortunately no longer available - the new water-based Neatlac is most definitely the best and even better than Block-out used to be]


Dyes and resist

My first answer would be that it could be that you are trying to use a spirit based dye over the resist and that will be less successful. 

On this scanned piece of leather I covered the bottom half of the leather with super sheen as a resist. On the very left I used antique gel on the leather - it wiped off nice and clean off the resist. 

 In the center I used Eco-Flo water based dye and although it did not wipe off the resist so very completely, the result is still successful. On the right I used a normal spirit based dye and the obvious result is awful. 


Now let us have a look at the intended use of a resist: 

Purpose: A resist is used before you use an antique stain to make sure the antique finish/stain does not change the color of the leather too much, but only gets into the tool impressions, so that it gives the antique effect. 

 Products: Several products can be used as a resist: Neatlac, SuperSheen, SatinSheen, Eco-Flow Top Coat, RTC. As you can see, all these products are also classified as finishes, i.e. they are also used as finishes on veg-tan leather after  (optional) dyes have been applied. 

 When to Resist: After tooling the project, you decide on a color for the project. This color change in the leather is achieved with dye. If you are also going to apply an antique stain to the project, and you do not want the antique gel / paste / liquid to change the overall color of the project, you need to apply a resist over the project first. 

Everyone recommends two layers of resist - and you must allow then to dry properly (I do overnight). The Effect: When you now apply the antique stain, and wipe it off with a soft damp cloth, the stain will only remain in the tool impressions and you will be able to wipe it off the smooth parts of the leather. 

You will have to seal in the antique stain by putting a layer of acrylic finish over the stain.

 Variations on Resist: You might choose to use the resist only on the tooled design and not on the background - a two tone effect. This will take some fancy brush work with a fine artist brush. 
It will mean that the antique stain will change the color of the leather on the unresisted areas, but on the tooled areas you will be able to wipe most of the stain off the leather. 

Preparing a test:
Using Resist - Before
This first photo shows some variations: From top left clockwise: 
1. The whole design and background was dyed with Eco-Flo Range Tan Dye and the left half of the quarter was resisted with Super Sheen. 
2. In the top right the design only was resisted with Block Out.

3. Bottom right the whole quarter was resisted with Block Out - both design and background.
 4. Bottom left the background was dyed brown with Eco-Flow Timber Brown and the design was resisted with Super Sheen.


And here is the result after applying the antique:
Using Resist - After
After the first photo, Antique Gel Medium Brown was applied as seen in the little Minimovies and this is a photo of the results. 

 Problems with Resist: Resist is not very successful to keep dye away from leather, especially the spirit based (alcohol based) dyes. These dyes will penetrate through most resists. 

 Here is how to have some fun with basketweave stamping and resisting a highlite stain:  
 (Updated 21 October 2019)

Sunday, July 15, 2007

Uneven dyeing


Dying certain areas only can be even more eye-catching if the dying is done in such a way that the area is darker around the edge and lighter in the center. 

Use of All-in-One

This photo shows the project with the dye completely dry - you will notice it is lighter than what it was in the little mini-movie. This project is done with a very old piece of leather - at least thirty years old - it is an old tri-leg chair kit. The leather is already darkened by oxidation, so I chose darker colors to color with. 

 The dye is the new Eco-Flo Cranberry Red dye. It is water-based. 
 I start off with diluting the dye a lot with water and I just cover the whole area with a thin color. 
 Then I use less diluted dye and only work around the edges, so that the area is dyed darker around the edge and lighter in the center. 
REMEMBER: The dye causes the leather to be WET and therefor darker, so it is not immediately clear what the project will look like when the leather dries out. The dye will get lighter as it dries. 
 This little video shows the final step with undiluted dye.


Use of mahogany
This photo shows a similar effect with Eco-Flo dark mahogany. Here the dye, and leather, is still wet and it does not look as though the transition from dark to light is going to be gradual enough. I will have to judge that only when the dye is completely dry.

X1 Applied
The completed seat after I applied a coat of X1 dressing (the old Drake's Dressing - now being sold by Realeather as One Step Leather Dressing). 
 The dye came out the way I wanted it, and I then applied X1 dressing to bring out the tooling in sharp definition. X1 only accentuates the tooling in a very non-obtrusive way.

Completed seatCompleted seat

The chair complete.

If you want to know where to get the legs, contact Dan at Logo's Leather: Logo's Leather 

In the next technique Tom Evans uses a rag to "dry brush" alcohol based dye to give a two tone effect.


 (Updated 22 October 2019)

Saturday, October 29, 2005

SkyHook

This nifty tool was developed by Tommy McLintic from South Africa. It comes in handy if you need to stitch articles that are too big for a stitching pony.

 
A. REQUIREMENTS: Length of Light Chain, 1,7 to 2,0 Meter in length (6'-0" to 6'-6") depending on the height of the ceiling above the jaws of the stitching horse; One Small "G" Clamp approx. 25mm (1") jaw opening; Two Leather Pads to suit the jaws of the "G" clamp; One Large screw type eyelet; One Large Cup Hook; and One Hook bent out of firm wire (See Figure 1 for shape of hook.)

B. CONSTRUCTION:
  1. Drill a hole through the body of the "G" clamp so that the end of the chain may be attached to the clamp. It may be necessary to use a small split ring for this purpose. Cement the leather pads to both jaws of the "G" clamp. The purpose of these pads is to help prevent the metal jaws of the clamp from marking the leather of your article. Make certain that the screw end of the clamp has a cup over the jaw that will remain stationary while the clamp is being tightened.
  2. Screw the large eyelet into the ceiling, preferably directly over the jaws of your stitching horse. Screw the eyelet into a ceiling beam, and not just anywhere in the ceiling. About 500mm (18" to 24") from the eyelet screw the large cup hook also into a ceiling beam. The cup hook is used to hold the chain and clamp, when it is not in use, closer to the ceiling, and out of the way.
  3. Bend a hook as shown in Figure 1, out of firm wire. Make certain that the end of the hook will easily go through the links of the chain. Thread the chain through the eyelet in the ceiling, attach the hook to the free end of the chain, and hook the hook through a link in the chain.
C. USE: The clamp is easy to use and it will hold awkward shaped leather items above the jaws of the stitching horse, making it much easier for you to reach, and to stitch in difficult places on your article. The clamp and chain is especially valuable when making cases such as handbags etc. Do not over tighten the clamp on the leather of your article, notwithstanding the leather pads on the jaws of the "G" clamp, it will still mark your leather. Always try to clamp on a buckle, "D" ring, or some part of the article where any marks of the jaws of the clamp will not be noticed.

 (Updated 25 October 2019)

Sunday, October 2, 2005

Stitch Groover

Here is a small MiniMovie showing the stitch groover being used. (347KB)  

Take note that it is the center extension of the handle that butts up against the edge of the leather to guide the tool along.  The tool is held at about 45ยบ.

Saturday, October 1, 2005

Bookbinding

Bookbinding instructions
This set of instructions has been on the web for many years and have been used by some universities in their study plans. 
 The main purpose of the instructions is to enable you to bind your valuable magazines together so that you can read them more frequently without having to look through boxes of loose magazines. 

Introduction

When I was a small boy, my father subscribed to a youth Magazine for me. After receiving all the copies for every year, he would bind them in volumes, which gave me endless pleasure for a long time after that.

After having done leatherwork for a number of years, I became interested in binding all the old leathercraft magazines I had accumulated. Before I could ask my father about his methods, he passed away. I then did extensive research, reading as much as I could, but also visiting bookbinders who still practice their craft by hand.

Traditional bookbinders use their methods, developed over centuries, because it produces the desired product and “because it has always been done that way”. I wanted something simpler, producing a stronger volume that could open completely for easy photocopying and I did not want to follow methods that required all sorts of weird tools.

The method I developed and describe here, is completely my own and not traditional at all. It works best for binding magazines that consist of single (or multiple) signatures, i.e. the original magazine was produced by printing it on wide pages, folding them in half and stapling the pages together on the spine.

This then is my way of doing it:

1. Assemble the magazines. Take out any contents that you do not want in there permanently, like the pattern pages in the Leather Crafter & Saddler's Journal. 
Do NOT take out the staples that hold the pages together. Some people argue that this makes the spine of the eventual bound volume thicker. In my experience, not noticeably. Having the pages float all over while trying to stitch the signatures (magazines) together is much more difficult.

2. Place all the magazines in their proper sequence, i.e. Jan to Dec.

3. Take blank sheets of paper, double the size of the magazine, and fold them in half to form “blank magazines”. One of these, consisting of two or three sheets of folded paper, is added in front, before the first magazine, and another is added to the back of the volume, after the last magazine. These serve to protect the magazines and as a place to take notes, paste in an index or table of contents of the articles. We will call these the blank signatures.


4. The magazines must now be “immobilized” or clamped in a bookbinding press.


You can get away with just weighing down the magazines under heavy books, or you could use two long pieces of wood that you clamp over the magazines with pistol-grip clamps you can buy in any hardware store. Or the two pieces of wood can be firmly tightened with long brass bolts and wing nuts.

All sides must be precisely squared up, as the magazines will now be “fixed” in their final positions within the volume.

Be careful not to tighten the clamps or book press too much. As long as the Magazines cannot slide around, you have enough pressure on them. I have made the mistake of putting so much pressure on photocopied (Xeroxed) newsletters that the print was transferred to the opposite page as well. With a book press it is not difficult to apply this much pressure.

5. Measure the length of the spines of the magazines and cut a piece of cloth 1½” shorter than this. It must be wide enough to cover all the spines of all the magazines plus 3” to the front and back of the volume.


Here the cloth has been glued to the magazines and the whole volume can now be handled free of the press or clamp.

I prefer to use unbleached linen, but you can also use the cloth from an old retired denim shirt - any cloth that will not stretch. The photographs for Fig 2, shows both the linen I use and the thread next to a dime, so that you can see the thickness of the thread. (For those of you outside the USA, a dime has a diameter of 17mm.)


6. Put glue on the spines of the magazines. Cold white wood glue / project glue is fine and I believe Leather Weld should work very well. Quickly put the piece of cloth over the spines and make sure that it is glued to every magazine and to the blank signature that is in front and back of the volume. Leave it to dry, preferably overnight.

This temporarily holds the magazines / signatures together while you stitch them to the cloth, but it does also serve to strengthen the final volume and give the spine a bit of rigidity.

7. When you take the volume out of the press, you will have all the signatures (magazines) glued to the cloth, with three inches of cloth lying on the top and at the bottom of the volume. The next Figure shows a cut-through view of the spine side of the volume.


STITCHING


The type of thread is not very important - it must not stretch, it must not be so thin that it cuts the paper easily while at the same time it must not be so thick that it adds too much bulk to the spines of the magazines. Have a look at the photograph above to see the thread I use. I draw the thread through a ball of beeswax once or twice to prevent it from knotting while I am sewing.


1. All the holes for the stitching is done from the inside of each individual magazine - from the exact center spread, so that all the pages will be held by the stitches. Never open up a magazine completely. Keep it as shown in the next figure.


Each hole that is made, is immediately used, in other words you do not make a whole row of holes and then attempt to find them all again to put the needle through.

2. Fig 4 above also shows how stitching is begun with the second signature, i.e. the first magazine after the blank signature. See also Fig 5 where the blank signature is invisible and only the first magazine is shown.

3. In Fig 5 the thread is shown to go in and out of five holes. These correspond with the five holes shown in Fig 8 as J, I, H, G and F, from magazine bottom to magazine top.

4. The first hole made, is # J. the thread is taken from the outside into the middle of the magazine and about 3” - 4” is left to protrude on the outside.


5. The thread is taken out at hole # I, looped around a Chinese Chopstick (not shown), and taken through the same hole back to the middle of the magazine again. The same looping is done at holes # H and # G.


6. At hole # F the thread is taken just to the outside. Open the first signature (the blank signature) in the middle, taking care not to shift the folded blank pages. Remember these will not have a staple through and can therefor move around.

7. Hole number E is now made in the first signature and the thread brought to the middle of the signature through that.


8. The thread is taken along the inside of the first signature to hole # D where it is taken to the outside, looped through the loop left there previously, dangling from hole # G and taken back through hole # D to the middle of the blank signature. The thread looping out of holes #D and # G will now give the cross section shown by Fig 6.


Take care not to pull the loop from hole # H in such a way as to pull the loop out of hole # I.

10. It is not necessary ever to have these holes in the same position in all the signatures. I prefer to have them a bit away from each other on purpose. When they are too close to each other, the thread tends to bite into the paper. So, if hole # E is 2” from the top of the magazines, hole # F can be 2.5” and hole # O can be 1.75 “ or close to that.

11. The same procedure done with holes # D and # G is repeated at holes # C and # H as well as at # B and # I.

12. When the thread comes out of hole # J, a knot is tied with the 3” of thread left there in the beginning.

13. The thread is then taken into the middle of the third signature (the second magazine) through hole # K.

14. The thread is taken to the outside through hole # L, looped around the threads from holes # B and # I and is taken back inside through hole # L. This basic step is now repeated until all the signatures have been sewn.

15. When the thread comes out of the very last hole, it is tied to the other threads on the outside and cut off, about 4” from the knot.


16. The whole spine of the newly sewn volume is given a thin layer of glue, the Leather Weld type, and left to dry.


The cloth has been sewn onto the magazines, forming a nice solid and secure spine.
The flap of material seen on top of this volume will be sandwiched (and glued in place) between the outer cover of the volume and the stiffener or inner page of the volume.


With the signatures now securely sewn together, the volume can now be set aside - it is quite sturdy and can even survive a trans-Atlantic crossing. If you are going to make a leather cover for it, this can be done at leisure.

COVERING THE VOLUME

1. There are no hard and fast rules about covering the volume. My father covered my youth magazines with cardboard box and brown paper and they outlasted my childhood. The covers look better than the insides. Here is my suggestion for the easiest leather cover. A lot of the basic techniques are left up to you. As always it will be a very good idea to try out every step on a test piece first. You can sew together a few folded blank pieces of paper and make a small note book to practice on.

2. OPTIONAL:    Between the first blank signature and the 3” of cloth lying on top, I sometimes glue in a folded piece of decorated paper, using normal paper glue. This paper was traditionally marbled, but can be plain colored or white. It is glued to both the cloth and the first blank signature page. The inside of this folded decorated paper will be what you see when you open the outer cover of the finished volume.

3. ALSO OPTIONAL:     On top of the decorated paper (on the outside) or the first blank signature, you can also include a stiffener. The always useful X-ray plates is one suggestion - any material goes, depending on how sturdy you want the volume to be. I like at least a thick cardboard. This is glued in under the cloth so that it is sandwiched between the cloth and the decorated paper.
[Update:  I have switched to just use thicker leather - about 8oz and that makes for a sturdy enough cover.]


4. To summarize: You will now have all the signatures in the middle, with a decorated page folded double on either side of the signatures. On the outside of these you will have an optional stiffener and folding over all of these, will be the cloth to which the magazines were sewn.


5. Cut and decorate the outside leather cover as you would to cover a paperback book. I prefer to cut this cover in three pieces - Front, back, and the spine. That way you can utilize the original leather size better (you need a smaller original piece of leather to cut the three smaller pieces from). 
They can be sewn or laced together. As long as you end up with one single leather cover that can be glued to the volume.

In the next photo I have placed the finished front and back covers above and below the bound signatures.   I want to measure how wide to make the spine - that cannot be done with a measuring tape - use a strip of the same leather you will make the spine of, and mark on there.   I overlap the spine piece and each of the two covers by 1/2" to allow for the stitching.
Everything for assembly:
I glue the spine first to one of the covers before stitching it.

6. Glue is applied to the whole outside of the volume, except the spine where the signatures were sewn to the cloth. This will never be glued to the leather cover - there will always be a gap along the spine of the volume between the cloth and the leather, allowing the volume to be opened up completely.

I use the Eco-Flo water-based contact cement - it does not badly buckle the paper of the blank signatures.

7. Weigh the volume down with other books or place it in a press again, being careful not to spoil the leather, and let the glue set and dry completely.

THE FINISHED VOLUME

You should now be able to pick up the volume only be the outside cover, which will consist of the leather, cloth, stiffener and one half of the decorative paper. The other half of the decorative paper is glued to the first page of the first blank signature, but unlike traditional bookbinding, this decorative page does not attach the cover to the volume - an inherent weakness in the traditional method.


You should also be able to open up the volume at a chosen page and put it face down on a xerox machine - completely flat. Of course, this depends also on the original binding method of the magazines.


HAVE FUN!!