The Use of the triangle figure carving beveler F910 stamp can be applied to a few other very effective borders!
This is a different description to do the rope edge effect also covered in another POST (with a video).

So referring to the photo:
The first of these designs start with a row of evenly spaced impressions with a checkered beveler. #J
Turn the leather around and make impressions with the same beveler in the other direction. This will have the effect of a ribbon woven through the leather. #K
Add diagonally opposed impressions with F910, and it now looks is if the ribbon is twisted as it is woven through the leather. #L
The second border design shows a line of basket weave stamps used end-to-end: two different stamps are shown for this at #M and #O.
Now add The F910 stamp again in diagonal fashion and you have a whole new border to play around with. #N and #P
In the third line you make little squares with a checkered beveler - I first stamped a row of them next to each other. #Q Then I add the top and bottom sides of the little square and lastly the fourth side of the little square opposite to the first side.
At #S you can see the added effect of using F910 in opposite corners and at #T you can see how it changes when you use F910 on two side-by-side corners.
I hope you enjoy playing with this!
[Updated 04/26/2020]
This is a different description to do the rope edge effect also covered in another POST (with a video).
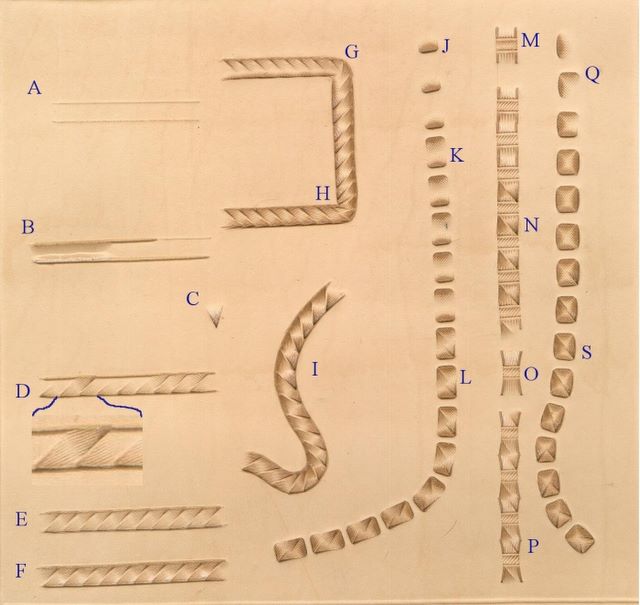
First begin by scoring two parallel lines with a divider. #A
Now cut carefully on those lines with a swivel knife. #B You can optionally also bevel the inside of the lines with a smooth or a textured beveler, as you can see on the left of the #B part. Alternatively you can bevel the outside of the rope when you are done with the rope itself.
All these border designs use lined stamp F910. #C
Now stamp a row of these ‘triangles’ against one of the cut lines as you can see in #D (the bottom line was done first).
To do the second line, in the opposite direction, study the enlarged piece to see how the tool is now lined up: one side of the tool is first lined up with the cut line (as in the first row) and the other side of the tool is lined up with the impression against the opposite line so that there is a slight ridge between them.
To clarify further - in the enlargement there is one impression at the top and three running in the opposite direction against the bottom line - see how the one impression in the top line up with the middle of the three impressions at the bottom.
As I indicated earlier, you can optionally bevel the two parallel lines after you have cut them with the swivel knife and before you start the stamping. Illustration #E was done without any beveling and illustration #F was done over beveled lines.
The border can be used very successfully around 90º corners. I like to use the dividers again to score the lines I am going to use. When I reach the corner, I let the inside leg stand still while the outer leg does the radius around the corner.
As you can see in illustration #G, the outside edge is stamped first and in the bend of the corner, I tilt the tool slightly forward so that it makes a smaller impression and so that it does not overstamp the edge. Then when I work on the inside line in the other direction, I keep to the same spacing I did on a straight line: every stamp corresponds to another on the outside line and is spaced so that there is a slight ridge between the two.
You will find that this causes the impressions to bunch up at the very corner so that all the sharp tips are almost on top of each other and this is OK!
Illustration #I shows the success of this border on curved lines. Again the outside edges are stamped first up to the point where the lines may curve in the opposite direction. There I stop with that side of the border and first do the other side, which will now become the outside edge of the curve as I proceed.
Throw a checkered beveler in the mix and you get a few more possibilities for borders:
The first of these designs start with a row of evenly spaced impressions with a checkered beveler. #J
Turn the leather around and make impressions with the same beveler in the other direction. This will have the effect of a ribbon woven through the leather. #K
Add diagonally opposed impressions with F910, and it now looks is if the ribbon is twisted as it is woven through the leather. #L
The second border design shows a line of basket weave stamps used end-to-end: two different stamps are shown for this at #M and #O.
Now add The F910 stamp again in diagonal fashion and you have a whole new border to play around with. #N and #P
In the third line you make little squares with a checkered beveler - I first stamped a row of them next to each other. #Q Then I add the top and bottom sides of the little square and lastly the fourth side of the little square opposite to the first side.
At #S you can see the added effect of using F910 in opposite corners and at #T you can see how it changes when you use F910 on two side-by-side corners.
I hope you enjoy playing with this!
[Updated 04/26/2020]
No comments:
Post a Comment